Recording and editing studio
Part of the Digital Media Center is recording and editing studio. It can be used for recording lectures or promotional materials. The studio is soundproof and is connected to the control room. Users can bring their own devices or after consultations with staff use DMC equipment:
- MacBook with integrated Full HD camera
- microphones (Blue Yeti, Rode Wireless Go)
- presentation
- recording and editing software (Powerpoint, Keynote, Garage Band, OBS, Final Cut Pro)
- Logitech C922 Pro Webcameras
Common services, that DMC provides and helps with are for example
- recording voice-overs
- presentations recording (slides with audio)
- basic post-processing and editing
Recommended software for presentations recording
Microsoft Powerpoint
Microsoft Powerpoint allows users to record the presentation, including voice-over of presentation. Microsoft offers instructions for the various versions of Powerpoint here: https://support.microsoft.com/en-us/office/record-a-slide-show-with-narration-and-slide-timings-0b9502c6-5f6c-40ae-b1e7-e47d8741161c#OfficeVersion=Office_365. For assistance and set up your device, contact DMC.
Note: Recording slides in Powerpoint is not very user friendly. Mac users can use Keynote, which is much better regarding presentation recording. Please see below other options, that may look too complicated at first, but in the long term will be very beneficial.
Open Broadcast Software (OBS)
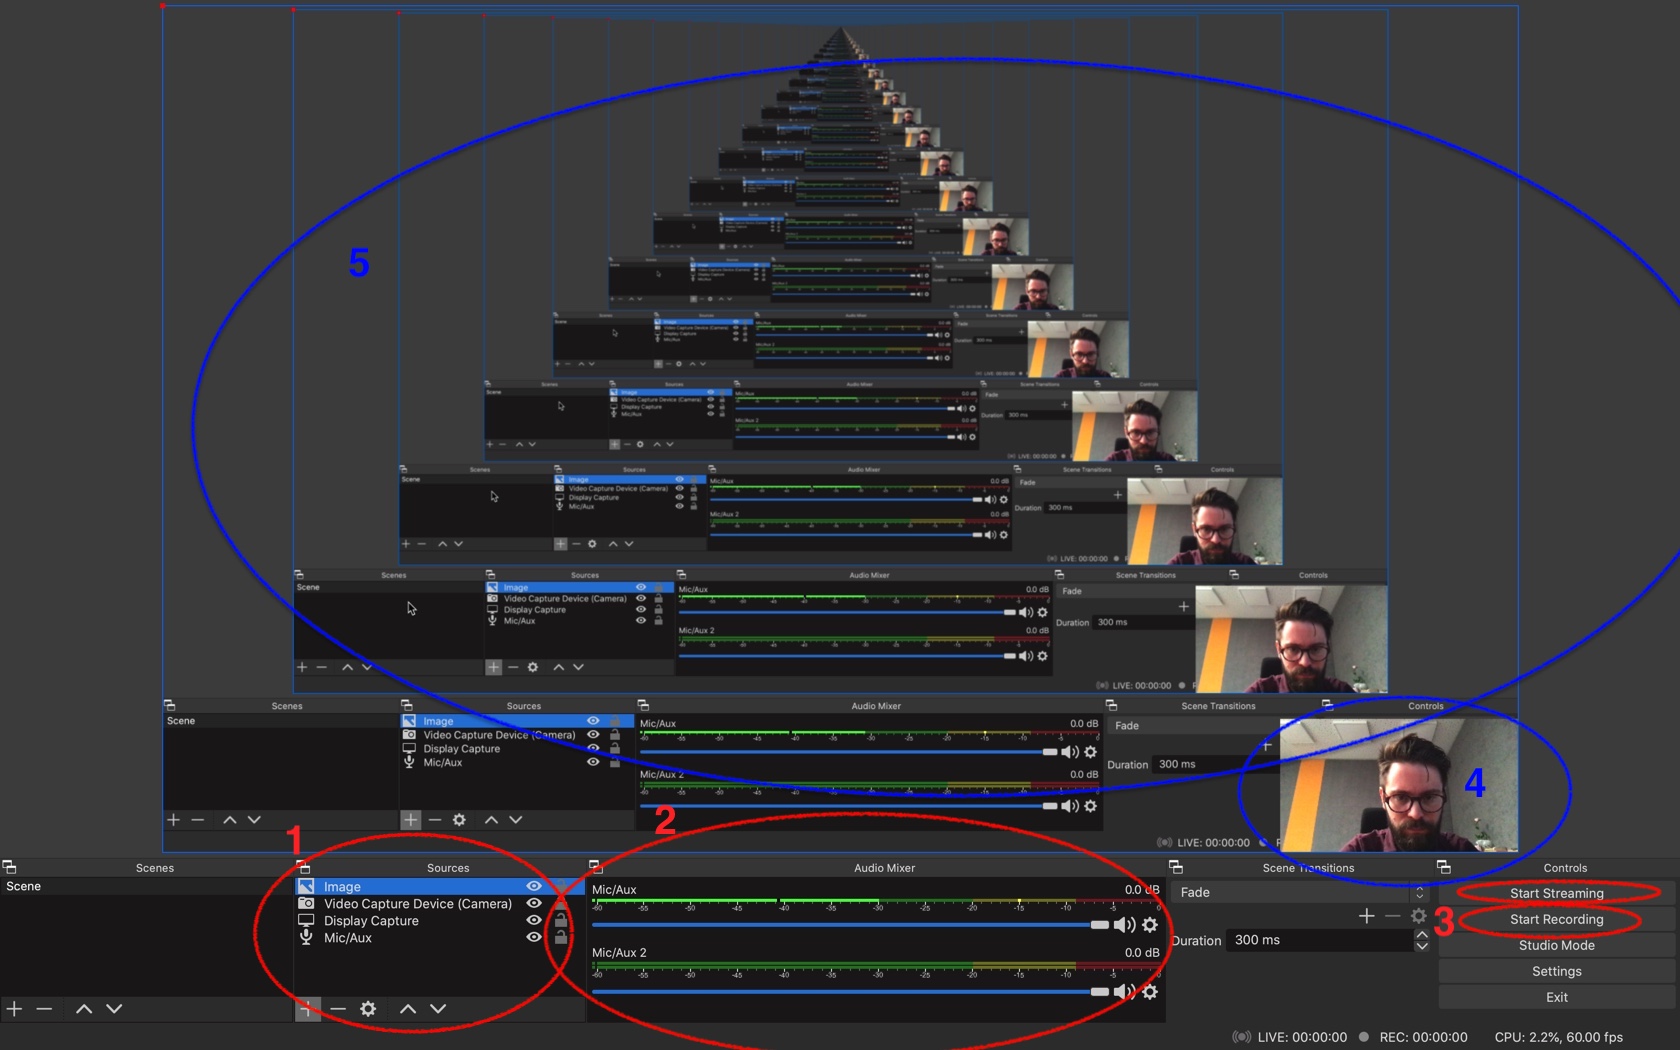
Open Broadcast Software (Studio) is a free and open-source tool for recording and streaming. Despite being free, it is powerful and is being widely used by creators. You can download OBS for your platform here. The common set up for recording lectures consists of screen (presentation) recording, camera, and the voice-over.
- List of recommended sources
- Audio level
- Start streaming and/or recording
- Preview of the camera
- Preview of the recording
OBS community shares various resources on their wiki. There are a few basic steps, users are recommended to take at the start:
- During the first run of the application, users are encouraged to use auto-configuration wizard, that sets the application to correspond with the device's settings (resolution, bandwidth)
- Continue with setting audio and video sources
- Set microphone for recording voice over
- Set screen recording or window recording (to fit the screen into the resolution right-click on the source, choose Transform and proceed with Fit to screen)
- Set your camera. In the preview set the size and place it to the chosen corner
Recording lectures using Zoom (Jan Zápal's approach)
1. What I describe below is my (Jan Zapal) 'teaching setup' I used in the spring of 2020 to teach microeconomics 2 (first year of the PhD) and political economy (second year of the PhD). The setup is optimized relative to my preferences, needs, and teaching style. Namely, I write a lot on the board, but also use slides. I did not want to use extensive time to 'redesign' my course. Least effort was the guiding principle. Another goal was to have a setup that was independent of CERGE/Lifesize - I wanted to avoid scheduling problems stemming from the limited number of rooms within Lifesize - and would allow me to teach both at the office and at home.
2. I use Zoom. When I teach, students are connected and can interact with me in 'real-time'. In order to minimize connection problems and background noise, the only camera and microphone that are on are mine. Students unmute when and only when asking questions. I record the lectures. Students report using the recordings even having been at the lecture (e.g, to check something they did not understand during the lecture). Absent students clearly benefit from the recordings. A free version of Zoom limits meetings to 40 minutes. The Charles University Zoom Licence is available to CERGE-EI faculty.
3. In terms of the technology, what I need as a minimum is a whiteboard, in front of which I put a camera and wear wireless headphones with a microphone. Camera resolution is important for what I write on the board to be readable. I bought Logitech HD Pro Webcam C920. Headphone microphone quality is important for what you say to be heard. I bought Sony WI-XB400. Putting the technology to work might take time, tweaking, experimenting, and further bits and pieces of hardware and/or software. These are specific to your system and you will discover what you need by yourself. (E.g., USB Bluetooth adapter to connect the headphones, software to turn off the autofocus of the camera so that what you write on the board is not out of focus when you step in front of the board.) Total setup costs were about 5000CZK.
4. Zoom allows one to record meetings. What ends up being recorded is what you show via the camera, what you show via the shared screen and any audio. All additional cameras (e.g., of the students) are also recorded, which is one more reason to keep them off since you don't want your slides showing small because there is another recorded window of a student staring at you. Storing the recordings might be an issue but all CERGE/Charles employees should have access to CESNET. An example of a recorded lecture is here. Uploading and sharing the video is done in a couple of minutes once you have CESNET access.
If you feel you need help with the first run of the app and testing, contact DMC.
